CV 入門 2
了解你的第一張圖片
1. 影像的三個基本資訊
import cv2
import numpy as np
import matplotlib.pyplot as plt
image = cv2.imread("/content/red_apple_on_grass.png")
image = image[:,:,::-1]  # 等於 cv2.cvtColor(image, cv2.COLOR_BGR2RGB)
print(type(image))   # <class 'numpy.ndarray'>
print(image.shape)   # (960, 1360, 3) = (Height, Width, Channel)
print(image.dtype) # uint8image[:,:,::-1]——::-1把 Channel 順序反轉, 可以達到 BGR → RGB 的效果type—— cv2 讀進來的就是numpy.ndarray, 所有 numpy 的操作都能直接用, 所以才可以使用::-1shape—— HWC 順序, 高度在前、寬度在後, 跟一般常講的順序「寬x高的圖片」相反dtype——uint8是 unsigned integer 8 bits (沒有正負號的 8 個 bit),
8 個 bit 可以代表的數值上限為 2 的 8 次方, 值域為 0 ~ 255
2. uint8 影像的數值加減
2.1 unsigned 的邊界: overflow 與 underflow
unsigned 型態當數值超出邊界時會把數值繞回去, 而且 numpy 不會拋出任何錯誤。
# Example
import numpy as np
a = np.array([200], dtype=np.uint8)
b = np.array([50], dtype=np.uint8)
print(a + 100)   # [ 44]
print(b - 100) # [206]- overflow ——
300超過上限, 繞回44 = 300 mod 256 - underflow ——
-50低於下限, 繞回206 = -50 mod 256
2.2 用 np.clip 修正值域
這個現象發生在 unsigned int 型態本身, RGB 影像也會有相同效果。
用灰階影像舉例只是因為肉眼對明暗的變化最直接, 對比看得最清楚。
overflow 時最亮的地方會變成最暗, underflow 時最暗的地方會變成最亮。
import cv2
import numpy as np
import matplotlib.pyplot as plt
gray = cv2.cvtColor(cv2.imread("/content/red_apple_on_grass.png"), cv2.COLOR_BGR2GRAY)
# 錯誤作法: uint8 型態直接加減
brighter_wrong = gray + 100
darker_wrong = gray - 100
# 先轉成範圍夠大的型態, 運算過程才不會繞回
gray_int16 = gray.astype(np.int16)
# np.clip 限制數值範圍之後再轉回 uint8
brighter_right = np.clip(gray_int16 + 100, 0, 255).astype(np.uint8)
darker_right = np.clip(gray_int16 - 100, 0, 255).astype(np.uint8)

fig, axes = plt.subplots(2, 3, figsize=(15, 8))
panels = [
    ("original", gray),
    ("gray + 100  (sky overflow)", brighter_wrong),
    ("brighter image (clip to 0-255)", brighter_right),
    ("original", gray),
    ("gray - 100  (apple underflow)", darker_wrong),
    ("darker image (clip to 0-255)", darker_right),
]
for ax, (title, im) in zip(axes.ravel(), panels):
    ax.imshow(im, cmap="gray", vmin=0, vmax=255)
    ax.set_title(title)
    ax.axis("off")
plt.tight_layout()
plt.show()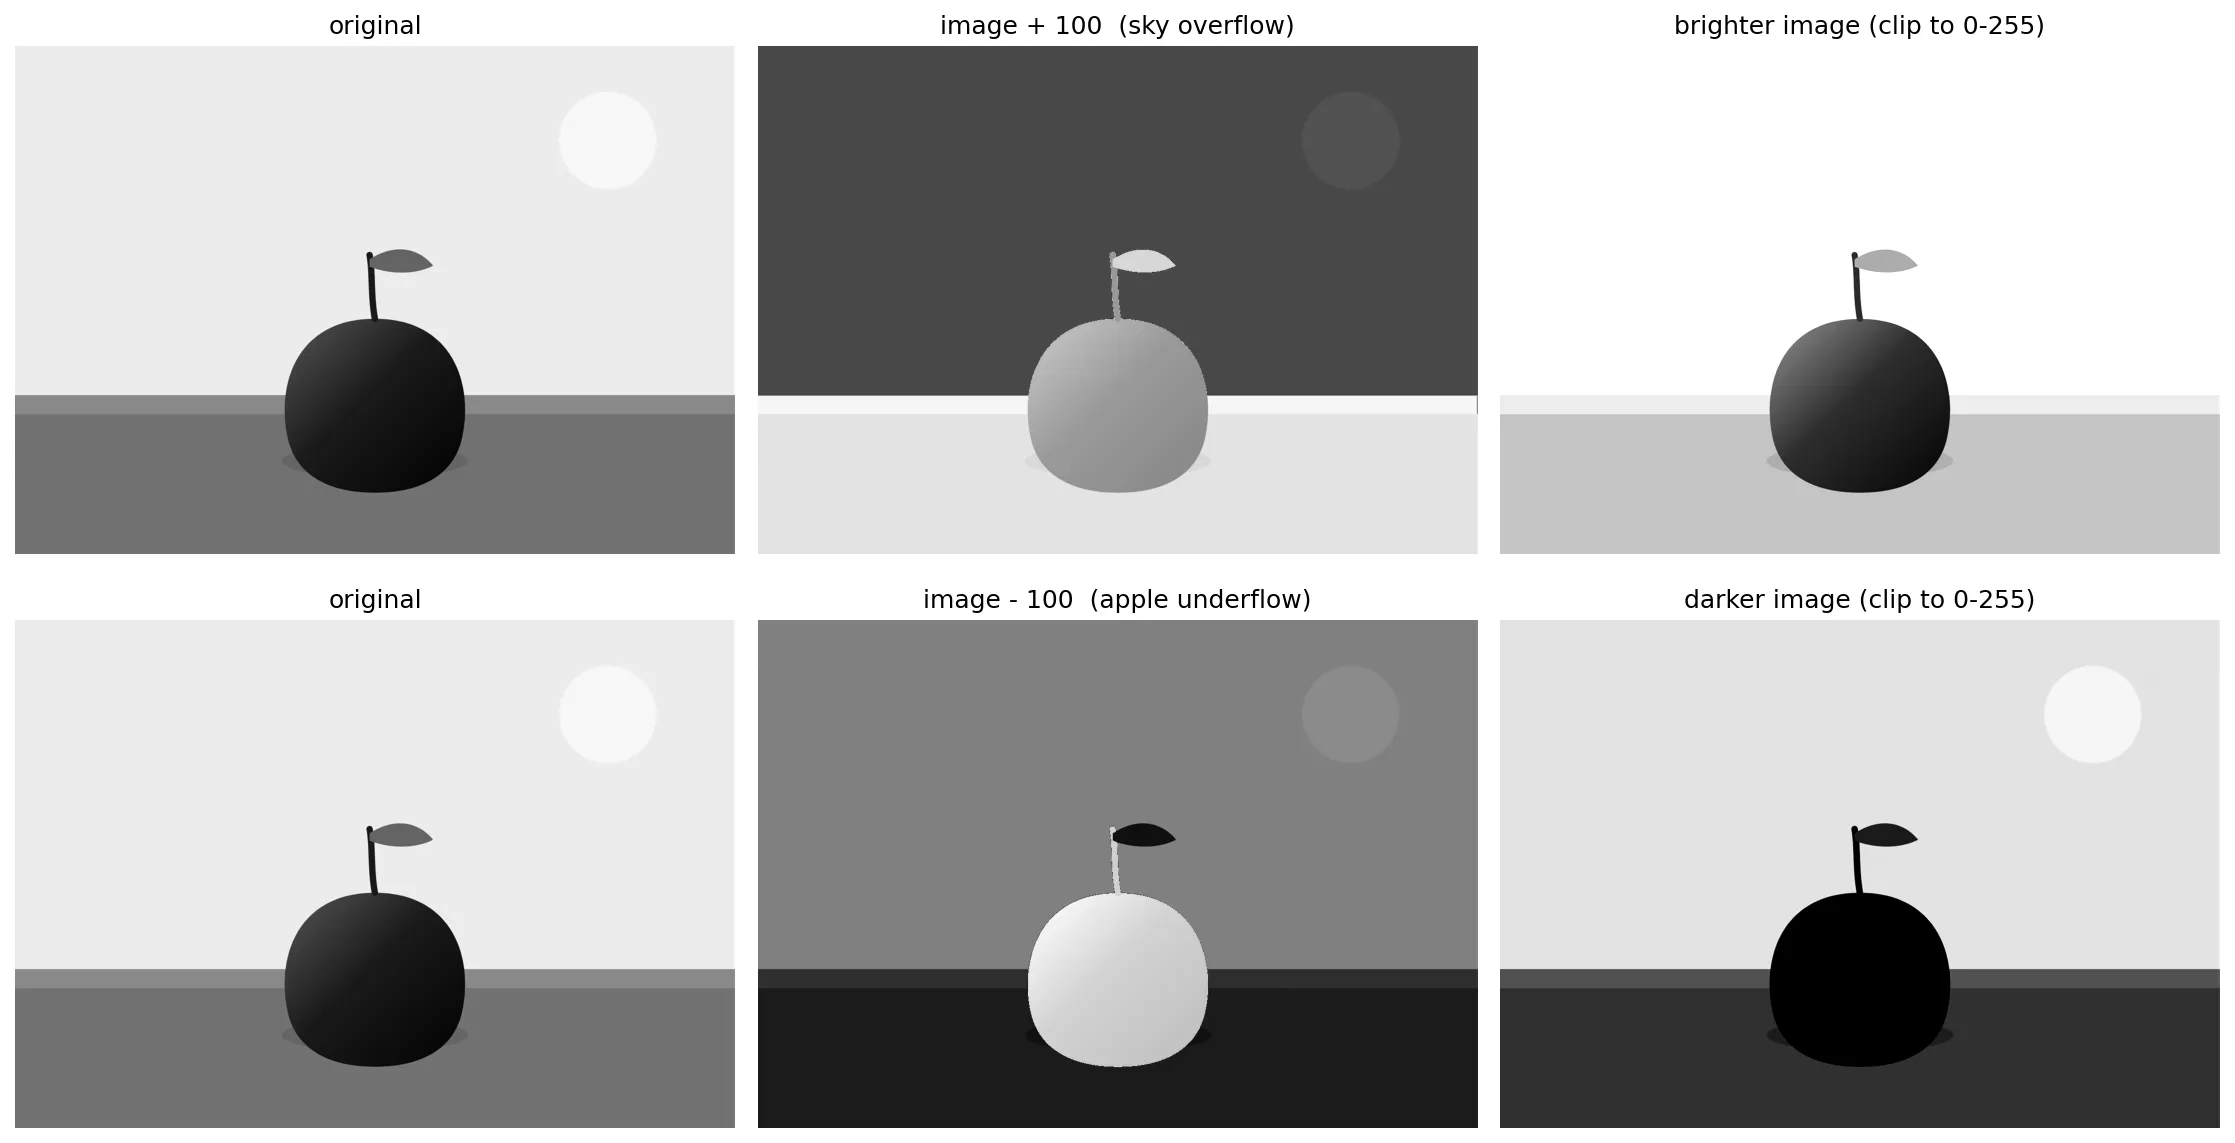
int16的範圍夠大, 值域 -32768 ~ 32767,
原本uint8數值是0~255加減 100 後的也不會 overflow / underflow 。np.clip值域限制在VAL_MIN ~ VAL_MAX之間, 因此可以再限制成 uint8 的值域- 圖片中間欄都是錯誤的結果 —— 讓天空從白變黑, 讓蘋果從黑變白, 右側欄是正確的結果
- 可以觀察到右上角的太陽在 +100 後跟天空融為一體, 因為兩者的數值都是 255 的最高值了 (白色)
筆記摘要
一樣是程式沒有報錯, 只有畫面看得出不對。
- 影像基礎資訊 ——
numpy.ndarray, shape 是(H, W, C), dtype 是uint8 - uint8邊界在哪 ——
0 ~ 255, 超出不會報錯, 而是繞回 - 如何修正邊界問題 —— 先轉成
int16運算, 再np.clip(0, 255)轉回uint8
做數值運算之前, 先確認資料型態和數值邊界在哪。